Showing posts with label Crafty Crafting Things... Show all posts

Thursday, April 22, 2010

Great table runner idea..

Am just ducking out from reading wonderful posts over
at 'Anzu' (you will love this blog), and felt I had to share
this great table runner idea that Ellen found via 'Brooklyn Bride'.

Image from 'Brooklyn Bride' via 'Anzu London'

I love the idea of using old photos (read: scans and printouts of..)
as a unique and arty table runner like this. What a great treat to have
old memories scattered on a table like that - imagine the lovely
conversations the pictures will inspire! Would be great for a family
reunion, wedding anniversary or birthday party. Endless uses indeed!

x Charlotta

Saturday, April 17, 2010

D.I.Y. - Fragrant candles..

I just realized that I am not doing enough D.I.Y.  posts.
In fact, I don't do enough D.I.Y. full stop. Must change this!
I love crafty self-made projects and could spend all day
doing things just like this one below if only life allowed. 


The post is from the wonderful '100 Layer Cake' and is
written by a guest blogger, 'Truly Smitten'. Both of these
blogs are amazing for crafty little projects and fantastic
for general inspiration and eye candy. I love them dearly!


Below is the essence of the editorial guide by Sarah, the writer;


Sarah warns that if you are a first-timer it might get messy and
she says it is always best to do a few batches at a time - bite size.

Here’s what you’ll need:
Glass tumblers
Wax chips / or microwavable wax
Candle wicks
Fragrance
Decorative paper
Natural twine
Double sided table
Skewer sticks

First you have to melt the wax in a double-boiler or in the
microwave if you manage to find that kind of wax flakes.
I actually don't know what a 'double boiler' is, but assume it
is a bowl inside a vessel of boiling water. Is this right?


Make sure the wax is properly melted before you pour it into
the tumblers and make sure you put the candle wick into the
glass before you do. The base should be attached to the
bottom end of the wick and top end tied to a skewer.

The scent is added before you pour the wax into the tumbler.

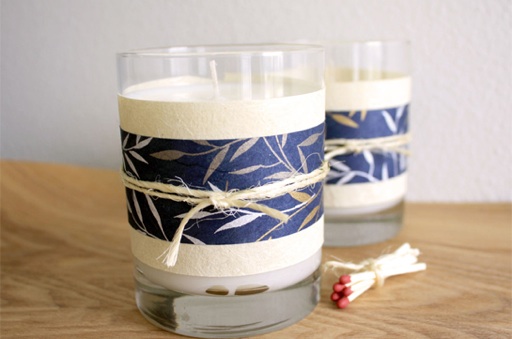
It will take a couple of hours before the was is solid and
cool. Once it is you can start the decorating. This particular
design uses Japanese rice paper and decorative crafting paper
applied in layers as the pictures below show. Needless to say
the options are endless here and you can design your own.


I would love to do this for a newly married couple and use their
monogram on the label, or for a housewarming gift, or for Christmas.. 
I am so going to try this one day, and if you do my lovelies, please
don't forget to tell me about it. I'd love to see your designs!

To read the original tutorial please go HERE.

xx Charlotta

P.S. If you like this project, do check out Sarah's other guest post
and tutorial about how to make 'Rosemary infused honey'.. So cute!

Friday, April 9, 2010

Monday, December 21, 2009

Christmas spirit

Just a little mixed bag of Xmas goodies..


I can never get enough of candle light..
source unknown

Love this little tree in a glass bottle..
By Swedish Åhlens


Have shown this before, but the tilted tree is
so charming that it doesn't hurt repeating..
via Tine K


Adorable silver deer
source unknown

xCharlotta

Monday, November 9, 2009

Egg-tastic!

If you aren't familiar with the 'Sweet Paul' blog, please do
scroll down to his link located towards the bottom right
of my blog, and jump across right now..
You won't be sorry - I promise!!

Here is a little snippet of loveliness from Paul...


An ostrich egg bought by the sweet man himself in Curacao
and decorated by hand by his good friend Claudia - so cute!

Wouldn't this be wonderful idea for an Easter breakfast table
- or just a loving touch for any breakfast gathering really...!?

Off to bed now to dream about what to write on my egg...

G'nite my dears!

xCharlotta

Thursday, November 5, 2009

For the love of nature

I truly love a piece of nature mixed in with my interior decor
and scattered around our home are examples of this.
A neat stack of perfect grey stones picked at the bottom of
a waterfall in the remote North of Sweden, a perfect bunch
of bare tree branches on the mantle in our dining room, a jar
of white star shaped shells that I found on a beach a few hours
South of Sydney, a sculptural piece of drift wood picked in
New Zealand, and a large heart shaped sandstone rock...

I like how these objects help ground our home, and how they
add a touch of warmth and personality at the same time as they
bring back some lovely memories about how we found them.

Here are a few lovely images of nature brought inside..


xCharlotta

Thursday, October 22, 2009

Halloween treats

Thought this would be a cute treat for all
spooky little door knockers at Halloween..


You could either make the stickers yourself, or buy ready-to-use
ones at your local super market or toy store. Either way they are
bound to make the little Trickers & Treaters very happy..


If you unlike me are a handy baker, these creations look fab!
Will make the fiercest of vampire visitors go vegetarian for sure!!

Ideas via fab Australian online magazine 'lmnop'.


xCharlotta

Sunday, October 18, 2009

Halloween DIY

One of my regular blog reads is that of

Not only are his ideas & projects inspiring, but his
skillful guiding also makes it easy & fun to carry out.
Great if you like me, have to be very time-efficient
with any extra curricular crafting activities.

Today's post was about these really adorable
little felt napkin holders - 'batkin holders'.


Click into Eddie's blog for instructions.

xCharlotta

Thursday, October 15, 2009

Pine cones

 Pine cones (and other cones for that matter) are
such a great decor resource for Winter.


I love decorating with them for Christmas and
it is just such a thing my mother and I used to do
when I was a wee little girl. We'd spray them
white, silver or gold and hang them in the tree or
put them on the Christmas table with candles & twigs.


Though these glammed up cones look great -
especially mixed with a few rustic basics,
a bowl of natural pine cones is just fabulous and
perhaps more in line with a Swedish style Christmas..


Here is some more inspiration for you.


I realize that some of these pictures are a little bit out
of date, but I love the ideas behind the actual execution..

Happy decorating!

xCharlotta

Tuesday, October 13, 2009

Crayon Rocks

Barbara Lee DaBoll, a special needs teacher
invented these fantastic 'crayon rocks' in order
to help children stimulate fine motor development.


The crayons are designed to stimulate the development
of the so called 'tripod grip' (thumb, and two fingers)
that help kids prepare for handwriting later on.


Since children often use crayons as their very first
writing or drawing tool, Barbara wanted to provide one that
was easy, fun and safe to use for all ages and skill levels.

 The crayons come in a range of fantastic natural mineral
colours (!) with a base made from organic soy wax,
making them non-toxic, eco-friendly and extremely smooth.


What a great gift!

xCharlotta

Friday, October 9, 2009

Ben & Kate Gatski

People who re-cycle are brilliant in my mind.
 They are even more brilliant if they manage to
create something fun & unique out of the material.
 Like artists Ben & Kate Gatski have done as they
collect machine parts from across Pennsylvania.


More from HERE

xCharlotta

Thursday, October 8, 2009

Chalkboard craze


Mmmm..
Bit like the sad & tired menu at our house this week...
(perhaps not that bad, but still..)


Have blogged this one before, but am doing it again
as I love the idea of the bench in a kid's room.


 This is a DIY chalkboard - surprisingly easy to make.
 Recipe
Find suitable vintage frame.
Paint it in desired colour.
Measure inside frame.
Have wood cut to size.
Paint with chalkboard paint.
Fit to frame.

Et voila!


 This gorgeous beast is from 'Room', however
you can easily make one by painting any desired
shape or pattern straight onto your wall, using
chalkboard paint. Fun little project..


 Same with this - easy to do if you have time
or the strength. I love the idea and result.


Or you can go full throttle and paint your entire
bedroom (or nursery) with chalkboard paint like
Jenna Lyons did in her fantastic NY terrace home.
See a post on Jenna's home HERE.

xCharlotta
Blog Widget by LinkWithin